Studio 3 Wrap Up

For my final studio unit, I feel like I made some progress, but not as much as I had done in previous trimesters, and instead for the most part just used the skills I had already learned. I really think I should have put more effort into researching more and expanding my skill set, but I’ll outline want I did learn and the things I want to learn and improve for the future here.

Character animation

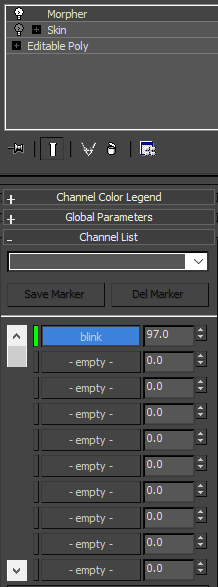
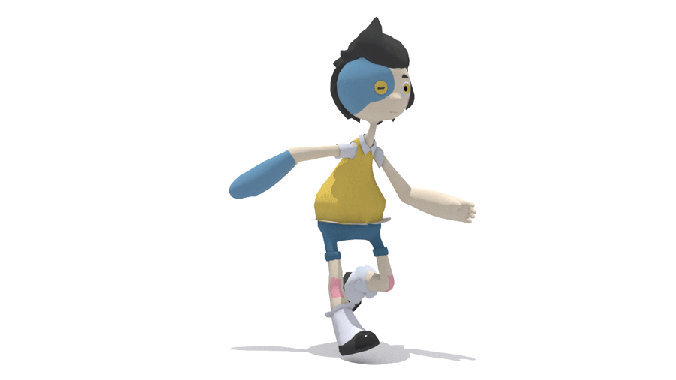
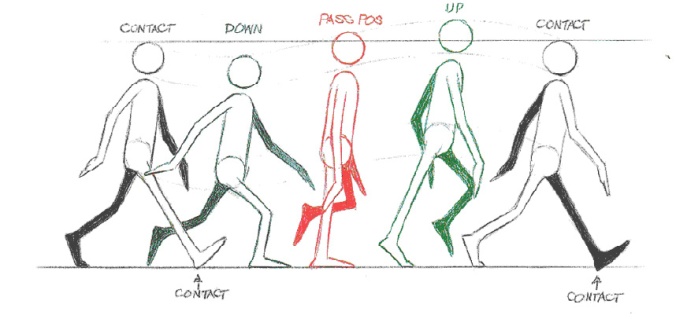
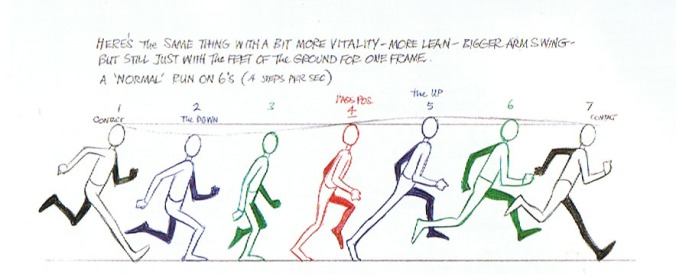
I feel like I learnt a significant amount about character animation- especially gameplay animation this tri as I had to create two sets- one for my specialisation and the other for my final project. After watching a few tutorials about animating run and walk cycles in max and finding them rather unsatisfactory, I developed my own pipeline from bits and pieces I’d learned from them which involves animating the limbs simultaneously, and then offsetting the keys of all the bones of one side so they naturally line up in a loop. This ensured my walk and run cycles are symmetrical and cut back on a lot of time. I also heavily referenced Richard William’s notes and altered them to better suit the characters.

spec-walk.gifspecrun.gif

contact_methodreference

This said I would like to do a lot more research on gameplay animation, like refinig my movement cycles and branching out to more diverse movements as well as more general animation like lip syncing and acting, work more with morph targets and also expand my skills to other programs like Maya and Blender.

http://www.digitaltutors.com/tutorial/475-Animating-Game-Characters-in-Maya


Facial Topology

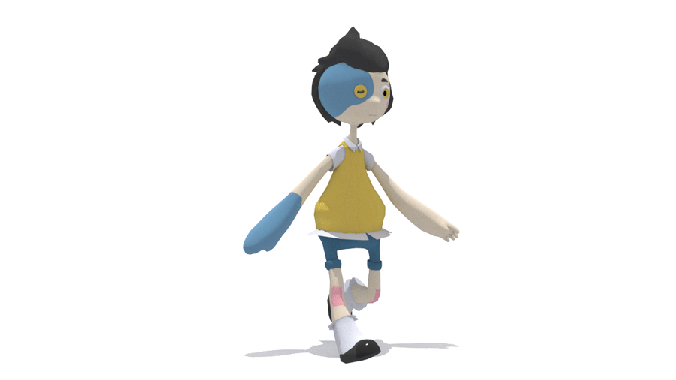
As a 3D artist focusing on characters, it’s important for me understand facial topology for animation to a good extend, to help ensure my models don’t end up in the uncanny valley. If there’s one thing I wish I researched more this trimester, it’s this. While I did do some research involving studying reference images and my use of topology is definitely better than previous trimesters, there was still a lot of room for improvement with my specialisation model. While I was able to copy what I saw in reference images I didn’t really form an understanding of the importance of the edge loops I was replicating, and because of that the final result had a few flaws, most of which stemmed from there simply being not enough topology. I intend to greatly improve in this specific area in modelling in the future and look forward to being able to properly animate expressions on my characters without regretting my funky topology.

Capture.PNG

This video goes through in detail the important loops to have in the face and their placement for facial animation and I’ll definitely be referring back to it in the future.

Blender

For the future I really want to start focusing on learning Blender, because I want to be able to afford the programs i use when I finish school and I’m sure a lot of studios do also, plus being proficient in another type of software is always something desirable. A good thing I’ve noticed with blender is that there is so many very high quality tutorials on it available for free on you tube, which I’ve already been looking at these holidays. The hotkeys and controls are very different from what I’m used to, but I am growing pretty fond of the UI already. I’ve been watching the Blender Cookie series

Specialisation research: Morph Targets & Animation Controllers

For a part of my specialisation project I researched morph targets for purposes of making my character blink and make facial expressions. Unfortunately I left this too late in the rigging and animation process so I didn’t end up being able to use it in my final animations, but I tested out an eye blink by following this tutorial:


blink 1.pngblink 2.png

This is the result! I definitely could have used a bit more topology around the eyes which I’ll definitely keep in mind when modelling or retopologizing next time.

The way to use morph targets is to preferably detach your character’s head from it’s body first and then duplicate it to create a base head for you to apply all future deformations to. You then go back to your original head and apply a morpher modifier to it. Return to the duplicated head again and make a copy of it. You can modify this third head’s vertices to you liking for the pose/expression you’re aiming for as long as you don’t add or delete any vertices. You can then return to the original head and put the third head object into one of the empty slots, and then you should be able to slide between the original head and the modified head and key frame it to your liking.

morpher.PNG

Applying morph targets was much simpler than I was expecting and I really wish I had researched it sooner so I could apply them properly to my model. I’ll be sure to make use of them in my pipeline in the future.

In a similar vein to morph targets is the Animation Controllers for Unity. Animation controllers manage your model’s animations, or states, and the transitions between them. It does this using a state machine, which is essentially a flow chart which you can use to connect the different animations in a manner appropriate for game play.

Image result for animation controllers unity

A state machine

For most games, it’s not appropriate for the the player to be able to transition from an animation state to any other, like from an idle to a running jump, so its important for the state machine to be set up an ordered properly.

An orange state is called a default state, which is what animation your model returns to when there are no inputs or other conditions happening in the game. This would usually be set to an idle animation.

The grey states are animations that don’t play all the time but rather when a condition is met.

The aqua state is called an any state, which exists to go to a specific state regardless of which state you are currently in, like if the player entered a cut scene.

All of these are transitions, which change smoothly from one Animation State to another over a given amount of time. They work well for fast simple transitions.

Blend trees are used for allowing multiple animations to be blended smoothly by incorporating parts of them all to varying degrees. The amount that each of the motions contributes to the final effect is controlled using a blending parameter.

The Animator Window shows a graph of the entire Blend Tree. To the left is a Blend Tree with only the root Blend Node (no child nodes have been added yet). To the right is a Blend Tree with a root Blend Node and three Animation Clips as child nodes.


Cross-Discipline Project: Slime Herder

For my cross-discipline project this trimester I worked on a pixel art mobile game in a similar vein to lemmings!

Initially I was just asked to make an environment tileset in a simple vibrant style, similar to Mario.

A few of these tiles went through a few iterations due to various reasons.  Initially I only made one ground tile but after getting them into the game we quickly realised we needed a ground tile with grass and one without, otherwise stacking them on top of each other wouldn’t look right. I also had to redo the trapdoor as first I was asked to make it only half a tile wide, though after some testing I was asked to make them a full tile.

Later I was also tasked with making a background and a button for the UI.  The background was to be bright and whimsical but still pastel to not clash with foreground elements, so I decided to use flat layering of graduating of colors so I could pump it out fast but still have it looking appealing. I also made some clouds that Ben set up to float across the sky as the game was playing and animated the foreground slightly later on for some extra polish.

Foreground_Animated_Background.gif

button updated.png

I’m really happy with how the game turned out! I think Curtis and I hit the aesthetic well, while the game is really fun to play! You can download it here

Ex Oblivione Post Mortem

Shoulda done this ages ago whoopsie daisy! Better do it now before I forget anything else!

My shot is the 3rd one, with the focus on the twisted tree, which followed the passage I chose in the previous shot deconstruction blog.

my shot.PNG

Critical reflection on performance

While I’m really happy with the final result, our team had our fair share of issues along the way! The first big hurdle was that we struggled as a team to decide on a story to base our project around. This was mainly caused by clashing ideas of what each of us want to achieve and personal taste, though after searching for more stories, coming forward with what we each wanted out of the story and voting we came to the decision of Ex Oblivione, which I feel was a story very well suited to the brief. Solution: while I think it was important that we discussed and took our time coming to the right decision, we may have been able to save time by spending less time lingering on ideas that the majority of us weren’t satisfied with, and instead move straight along to the next or a new idea until we came across one that we all like the sound of.

We also had a slight shift in direction after receiving Craig’s feedback because we hadn’t considered certain things and our shots didn’t tie together as well as they should have. We altered our colour scheme and clarified the mood of our project to help unify in more, but we didn’t incorporate our shots in with each other when we really should have. Solution: Have an unreal scene straight from the start, blocked out, that we all progressively add our completed models to, instead of being left with the daunting task at the end of trying to combine all our different scenes. This also would have helped with ensuring our whole project remained unified in style and lighting.

Personally, I had a lot technical issues, first being  with the Kite Demo assets that we decided to use to help help keep our scenes uniform, where either they weren’t displaying their textures or  they were causing performance issues. As a work around solution I decided to just use the assets I had made, which kind of made my shot stick out from the rest in terms of quality but I was happy that I could say I made everything in the scene. My second technical hurdle was my PC’s hard drive giving out, which Was Not Fun, and I should have been more aware of the warning signs. Luckily because I was bringing my scene in to work at school so often I had a very recent copy of it on the drive, and finished it at school, solving that problem for the project, atleast. Lastly UE4’s sequencer was causing me issues, but after Steve kindly helped us I was able to sort it out and get my shot rendered out.

Creative work and processes used

Gantt Chart.PNG

We went through a number of creative processes during this project, namely concepting, project planning, 3D asset production and post production. For the most part these went well, though I feel everyone should have been more involved in the project planning part and we could have gone more in depth, as most of the documentation we had went unused or deviated from. I think if everyone was more familiar with the documentation through collaborating on it, it would have been more useful and helpful to us.

project plan.PNG

Personally I think need to improve my skills in Unreal as I feel the final shot of my scene could have much more polished if I had a better understanding and more control in the engine. Most of what I achieved was through trial and error and it was a really slow process, and I think if I researched more about it I would have been more efficient and ended up with a nicer looking final product.

Roles in the animation production process

In terms of key performance indicators, I feel like I did a satisfactory job overall. I think I did enough in the areas of work ethic and time management to end up with a good quality end product but definitely feel I could have put more in to them to have ended up with a better polished product overall. I think I handled communication skills, attitude and acting as a team player rather well, as there wasn’t many huge roadblocks we had due to communication or other interpersonal issues, and any we did have I made sure to work through by talking it out. For problem solving, flexibility and working under pressure, even though I had my fair share of significant issues I was able to solve them or work around them despite working on a limited timeline, so I feel I did that quite well also. In terms of accepting and learning from criticism, I think I was able to apply some of the feedback we received successfully but should have tried harder and pushed for taking aboard more suggestions we received as I think it really could have helped our project.

For strategies to improve my performance in each of these indicators, next time I would definitely set up a grey box scene in unreal or similar gradual additive process for the project so I would have had to spend less time on sorting out all the objects at the end of the timeline, and instead have more time allotted to polishing. I could have also benefited from a stricter schedule so I could have gotten more assets done in the first place, which would have also helped with creating a more finished looking final product. As for the communication and interpersonal indicators, I could make more of an effort letting the team know where my progress is at and also make my assets more readily available for them to use if they need to, instead of just posting them when I’m done without notifying anyone. I feel researching more in the first place would have helped me with problem solving and flexibility, as I would have a more knowledgeable basis to troubleshoot on and it may have helped remove a lot of the pressure that came from these issues. I think a good way to ensure I follow criticism I receive is to alter whatever documentation I’m following to appropriately reflect the change I want to make to the project, to make it more ‘official’ and accessible. Having meeting to discuss the changes and make sure everyone’s on the same page would be very helpful too.


Ex Oblivione Shot Deconstruction

I’m getting flashbacks to highschool english classes oh golly

Best just to power through! For my group’s Worldbuilders project we’re using H.P. Lovecraft’s short story “Ex Oblivione” which is from the perspective of a person incredibly unhappy with their life and seeks an escape from it in their dreams. They describe a golden wooded valley with a wall and a locked gate of bronze at the end of it, which they take immense interest in opening and discovering what is on the other side. Upon acquiring the knowledge on how to enter it, the protagonist discovers beyond lies an inescapable white void, symbolic of death.

I am doing a shot focusing on the golden valley’s forest, using the following description:

I walked through that valley, and longer and longer would I pause in the spectral half-light where the giant trees squirmed and twisted grotesquely, and the grey ground stretched damply from trunk to trunk, sometimes disclosing the mold-stained stones of buried temples”

The dreamworld is described very positively in contrast with the waking world, using very vivid imagery and the repetition of the use of golden and bronze implies the protagonist believes the dreamscape is precious and valuable, while the waking world is very vaguely touched upon, using the words grayness and sameness. Therefore because the environment is portrayed in a good light, I wanted it to feel welcoming and beautiful even though it was described with language like ‘squirmed and twisted grotesquely’ plus the undertone of death.

3 Kate Concept.png

I tried to make use of a lot of golden light streaking through the canopy, as it not only provides a warmth to the scene but also alludes to the idea of the afterlife and the idea of heaven. The vivid use of color can help insinuate that this is a dream, as well.

The grey and twisted trees that fade into a dark background and the eerie statue saluting the sky are supposed to hint at the morbid undertone of the story. Statues are often built as a memorial, which ties nicely in with the concept of death. The statue’s pose also assists this, with her holding her hand toward the sky, or ‘heavens’ in an almost worship-like way. The fact she is crumbling along with the bricks surrounding her implies that nothing lasts forever- even the most permanent of materials, again acting as a reminder of our ever-present and unavoidable mortality. (CLO_08 – Effectively communicate what your intentions are for your project)

forest-spirit-miyazaki-ghibli

A scene with similar themes and visuals is this one from Princess Mononoke. It has a heavy focus on nature and similar vibrant golden light, which paints the forest as precious and heavenly- again alluding to the afterlife- and fittingly so as the shot also depicts the forest spirit, a very sacred character in the movie. Along with this the shot has a central focal point, which helps create an air of power around whatever it is depicting. The spirit’s many pointed horns also contribute to this idea, as they resemble a very large crown which introduces regality and importance to the shot. Like my shot, the main focus is framed by organic life, which not only helps to cement the scene’s location in the forest but also alludes that the subject matter and the forest are in harmony and support each other. As well as this the shot suggests the ideas of life and death, as during the day the spirits is in a fragile, mortal state, depicted as a dear like creature which has connotations of being vulnerable and fleeting. Also, a major plot point in the movie is that the spirits decapitated head grants immortality, at the cost of killing everything else in the surrounding area, which ties in nicely with Ex oblivione’s concept of death being an exchange for something: in the protagonist’s case it was death in exchange for happiness, and in Princess Mononoke’s case it’s undeath in exchange for despair. (ANM230.LO07 – Demonstrate understanding of genre, context and aesthetics through critical analysis and cultural critique)

Endless Runner/Specialsation: Production

Artstation: https://www.artstation.com/artwork/DNbyG

Next up was to actually produce some work! I used a production pipeline similar to one that would be used for a realistically styled game by following a few tutorials and modifying parts of them.

My process ended up like this:

Character model:

  • Concepting
  • Base low poly model in 3ds Max
  • Sculpting in Zbrush
  • Retopologizing in Max
  • UV Unwrapping in Max with the TexTools plugin
  • Baking Normals in XNormal
  • Texturing in Quixel
  • Testing in Unity
  • Skinning in Max
  • Animation in Max
  • Testing in Unity

Other Assets:

  • Referencing
  • Modelling in Max
  • UV unwrapping in Max using TexTools
  • Texturing in Quixel
  • Testing in Unity

Concepting

Snowlady concept (1).png

I chose to do the snowy landscape theme for my part of the endless runner and so tried to create a character that would look like the fit in that kind of environment. My first concept was the one to the left, but I decided to scrap that one because it didn’t really have a purpose or role, so I designed the second character to be a hunter and tried to convey a little more personality in her design.

Modelling

body.PNG

Because I hadn’t used Zbrush before I decided to start with a base for the body to at least have somewhere to start with my sculpt. I studied appropriate face topology for this and actually reused the head of this model when retopologizing.

Sculpting

http://www.digitaltutors.com/tutorial/1093-Introduction-to-ZBrush

I closely followed this ‘Introduction to Zbrush’ course on Digital Tutors to learn how to sculpt and applied what I learned to my character, like what tools are, the hotkeys, how to edit the resolution of your mesh and all sorts of other things. I found it incredibly helpful and probably wouldn’t have been able to figure Zbrush out without it! To do the clothes and hair I referred to these tutorials on Youtube because the digital tutors one didn’t cover that. (ANM220.LO07 Evaluate the literature on contemporary animation practice and use this information to shape and develop your own practice)

body front.PNG

Progress shot

front.PNG

Final sculpt

Retopologizing

http://www.digitaltutors.com/tutorial/2291-Creating-a-Stylized-Creature-for-Games-in-ZBrush#overview

I used a course called ‘Creating a stylized Creature for Games Using 3DS Max and ZBrush’ to learn how to export my sculpt from Zbrush to 3DS Max and retopologize. I found the process much simpler than I was expecting though it was quite time consuming! I mainly used the extend tool in the freeform ribbon tab. I made sure to keep animation appropriate topology and keep it relatively low poly since it would be animated and in a game. (ANM220.LO07 Evaluate the literature on contemporary animation practice and use this information to shape and develop your own practice)

retop.PNG

UV Unwrapping

The ‘Creating a stylized Creature for Games Using 3DS Max and ZBrush’ also came in really handy for this! It suggested to use TexTools and I found that incredibly helpful and think it sped up my process quite a lot! Along with this it showed how to use symmetry with your UVs which saved me heaps of texture space.

uv.PNG

Baking Normals

Again, I used the ‘Creating a stylized Creature for Games Using 3DS Max and ZBrush’ and it recommended separating all the different parts of the mesh and sculpt to do an exploded bake for better quality, so I went ahead and did that. I then plugged both my high and low poly meshes into X normal and baked it out. I had to play with settings like the padding until I got something I was happy with, and fixed the rest of the obvious errors in Photoshop by painting over them. I should do a little more research into how to do this better in the future because there were quite a few iffy bits!

KateAvatar_normal.png

Texturing

Before bringing my model into Quixel I baked out an AO map in X normal too, which I found much easier to do than in Max! I then played around with the materials in Quixel until I had textures I was happy with. I then tested out the textures in unity and found out it didn’t support gloss maps, but I felt they weren’t really needed.key_1.png

Skinning and Animation

I then skinned it and animated the final run cycle for the game which I went over in this post. I then opened everything up in unity again for a final test, then uploaded the final .fbx files for use!

For the other assets I went through a similar process, but only using the steps outlined in the list at the top of this post. (ANM220.LO09 Research, design and implement a production pipeline for a chosen specialisation.)

Here’s some footage of the final game! We collaborated with Chris Gleeson, an audio student to provide us with a different background track to better suit every different theme, and it’s a shame that all the audio that was made couldn’t be used because not all of themes had complete model sets. Along with this some sound effects for the characters voices were added for when they jump, slide, get a pick up, or hit something. (ANM220.LO02 Effectively integrate sound with animation.)

References:

http://www.digitaltutors.com/tutorial/2291-Creating-a-Stylized-Creature-for-Games-in-ZBrush#overview

http://blog.digitaltutors.com/understanding-a-3d-production-pipeline-learning-the-basics/

https://www.pluralsight.com/courses/game-asset-production-pipeline-unity-1929

http://blog.digitaltutors.com/whats-the-difference-a-comparison-of-modeling-for-games-and-modeling-for-movies/


Endless Runner/Specialsation: Planning

I chose the modelling Specialization for this tri and was also part of the endless runner project, and since I had to do very similar things for both of them I decided to combine them into one to help save time! I learnt a whole bunch through this project, like how to sculpt, retopologize, bake normal maps using x normal, some basics in unity and how to animate a run cycle.

To start off with I help out Ben a little bit with the project conception and management side of things. He explained his concept to me and I explained from an animators perspective what that would involve from us and other things to be aware of. For example, we intended to just use one set of animations and a specific rig and apply them to everyone’s models, but I brought up that doing that would probably make it hard to include secondary animations for people’s characters if they had long flowing parts or something similar. We didn’t want to increase to workload for everyone even more by asking them to do animations also, so Ben made sure to make everyone aware this at the start of the project.

Along with this, based of Chris’s suggestion, I made a starter kit and instructions for the project to help ensure everyone’s models were to the correct specification and to make the programmers jobs easier. I tried to consider as much as possible and explore any issues that could arise down the production pipeline while also consulting with Ben to see if there was anything I could to do to make implementing the models in the game easier. For example, I set the pivot points to the bottom-center for the obstacle assets and to the start of the road sections so they could easily be adjusted to the correct positions in engine. staterkit.PNG

instructions.PNG

Along with this we had a folder in google drive set up, and because we were doing a parallel style production everyone had their own folders in which they could place their models into rather than having different folders for each different model ect. and we fond it worked very well foe the people who ended up completing their scenes. We also had a slack channel set up were we could announce meetings, show were we were up to and ask for feedback or questions and found it was essential for the communication in this project. (ANM220.LO14 Describe efficient workflows for handling asset data across various production stages, from concept to completion.) (ANM220.LO17 Implement & maintain technical frameworks that allow for collaborative production)

google drive.PNG

slack.PNG

To try and help keep everyone on track we had weekly meetings on Wednesdays where we asked to be up to a certain stage in the production pipeline and show off our work to the rest of the group to receive feedback. I think this agile based methodology would have been very effective if the endless runner wasn’t a side project and more of team could have been up to date, but it worked very well for me and kept me pretty well on track.

(ANM220.LO15 Produce work on time and within scope by engaging appropriate project management methodologies)


Digital Sculpting Research

Digital sculpting technology is a comparatively recent method of creating Computer generated 3D models, which involves using software to manipulate a digital object as if it were made of a real-life substance such as clay by providing tools such as push, pull, smooth, grab and pinch.

matt-thorup-cyrusturn

One the first occasions of when digital scultping software became avaliable was in 1999 at SIGGRAPH (short for Special Interest Group on GRAPHics and Interactive Techniques) where Ofer Alon, the founder of Pixologic Inc, presented their newest software, ZBrush, which remains one the most prominent 3D sculpting software today. It gave 3D artists the ability to create highly detailed 3D models in much more natural and intuitive way, and revolutionized many different types of production pipelines.

Video games, for example, has been influenced by such a degree by digital sculpting that in many production pipelines the process of creating a 3D model has been reversed. Instead of beginning with a low poly mesh and only using a sculpting program for detailing, now high resolution sculpting is now the starting point, meaning an artist has the freedom to experiment with making the most suitable character first before creating the best topology for animation for that figure. (ANM220.LO04 Describe how the history of a chosen specialisation has influenced current industry best practices) (ANM220.LO07 Evaluate the literature on contemporary animation practice and use this information to shape and develop your own practice)

Since digital sculpture produces work very similar to traditional sculpture, you can apply the elements art to it as you would with a physical work of art. The elements of art are form, line, color, space and texture, though clearly some are more applicable to digital sculpting than others, namely form, colour, space and texture.

Form refers to an image’s shape, volume and believability that it exists in 3D space, and is probably the most important element for sculpting. There are two types of forms, geometric forms- which have a specific name associated with them, contain simple 2D shapes, and are usually man made- and organic forms- which do not typically have names asscociated with them and are comparatively complex when compared to geometric form. These two types of form could be associated with whether hard surface modelling or sculpting would be better suited to a particular shape. A sculpture’s form must be recognizable and accurate from every viewing point in 3D space for it to look aesthetically sound. For example, I had to study the shapes that occur in plaits to help make my characters hair convincing in 3D space. I found that if I pictured the plait as three separate and very malleable pieces of rope it was easier to get the placement of the hair to look right.

form.PNG

Texture is another very important element in sculpting and is integral to communicating what a surface is actually composed of, and can help add interest and contrast to an image. Texture, unlike the other elements, is strongly associated with the sense of touch, and how vividly something is able to depict how it’s surface feels usually depends on how realistic it looks or is. Texture in art can be split into two categories: Actual or Implied texture. Actual texture is what an artwork feels like when you actually touch it, like a physical sculpture or the surface of a painting. Even though digital sculpture is in three dimensions it is also impossible to actually touch unless 3D printed, so digital sculpting will more often fall under the implied texture category and the same can be said for physical marble statues that depict textures like fabric and skin. Implied texture is when something contains an illusion of texture. To create a more believable implied texture for a 3d model you can include a range of different maps, like albedo, normal, specular and gloss, along with actually adding texture to the topology of your model by sculpting. For example, in the image below the stitches were sculpted in while the texture on the fabric was added through applying a normal and albedo map in Quixel. (ANM220.LO05 Research and describe the role of visual fundamentals in producing aesthetic images in a chosen specialisation)textures.PNG

References:
http://pixologic.com/zbrush/industry/video-games/

http://cymae.deviantart.com/journal/A-Visual-History-of-3D-Art-284617122

https://en.wikipedia.org/wiki/Digital_sculpting

https://en.wikipedia.org/wiki/Elements_of_art

http://thevirtualinstructor.com/form.html

https://www.sophia.org/tutorials/elements-of-art-texture


Solving the janky foot problem

So recently I volunteered to create a run animation for the endless runner, as the one we were supplied wasn’t exactly what we were after. However I didn’t know how to ‘mirror’ the steps to make them identical, so then came up with the idea to animate both feet taking the same step and then offsetting one to create a run cycle with identical steps.

run.gif

excuse the crappy render and slow speed!

I had to skin my character to the rig Kynan made for the project, which my character didn’t exactly fit, but I tried my best to make sure the mesh deformed as appropriately as I could make it. (ANM220.L O03 Produce user friendly animation rigs suitable for an intended purpose.)

skinning.PNG

It wasn’t very fun

However I ran into issues when importing the animation into unity. For some reason, the right foot would twist, creating quite a painful looking run in-engine.

ow.PNG

ow

I had no idea what was causing this so initially thought I had accidentally done something to the rig. I tried very hard of find anything out of place but couldn’t, so decided to try resetting the X form. It did nothing, so I did some googling. After quite a search, I found a post online where a person said they had the same issue as me, and said they found the solution by including the rig in T-pose on the first frame then beginning the animation loop in the frame after that. So I went back into the max file where I had the animations, moved the default T-pose to be included in the animation at frame zero, exported it and imported it into unity and I found it worked for me too! (ANM220.LO06 Access and apply information independently to solve creative and technical problems)

ye.PNG


Trust In Time Post Mortem

For one of my cross-disciple projects this trimester I worked on a 2D pixel art game in a domestic interior setting. It was super fun to learn and slowly be able to flesh out a house using tilesets and sprites.

I found this video super helpful, and informed basically the entire process I took:

Here are all the assets I made! I ended up making much more than what was needed because the game designers wanted the assets from all four angles, and even though I discussed how it was unnecessary with them it only actually changed at the very end when the games programmers went through and cut the unneeded angles out with me, which saved me a bunch of time.

all sprites.PNG

all sprites2.PNG

note:i didn’t make the rug or wooden block assets (ones without thumbnail)

For a better view I threw together at least one angle of every asset below!

assests.PNG

And here are the animated character sprites I made! The game went under quite a huge change just after I had finished the mother’s walk cycle and it didn’t end up getting used, but I think it was a good practice for walk cycle that would actually be used in game.

Mother_AnimationsChild_Animations

All of these assets had to adhere to the 128×128 tile set size and be submitted as .psd files and be aligned appropriately depending on what direction they were facing. For the  animated sprites, each frame had to be centered in one of these 128×128 tiles and be place logically so they would look right and be easy to implement in engine. (ANM220.LO08 Investigate and implement art production pipelines for artists working in real time environments.) (ANM220.LO20 Create visual assets for other creative media projects to a documented specification)

I wasn’t really given a set style to work from for the interior assets other than simple, but tried to stick with a simple and slightly dated decor and tried to repeat certain textures and colors thought the assets to give a more unified feel. (ANM220.LO10 Combine elements with consideration of visual fundamentals to produce aesthetically cohesive work)